|
Basic Audio Troubleshooting
There are many ways to troubleshoot a system that has a fault. This page will show some of the common ways to troubleshoot common faults. You may find ways of troubleshooting that work better for you. If you do, use them. These are only suggestions to help you understand the basic process.
System working properly:
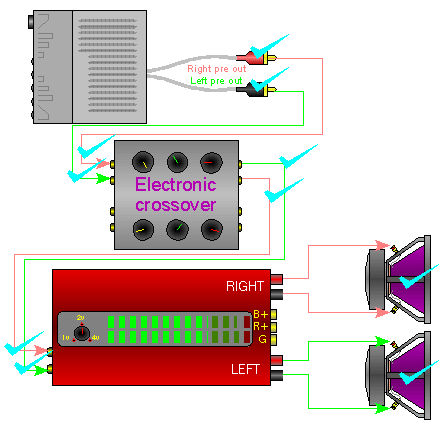
This diagram shows that the signal from the output of the radio to the speakers is OK. Both channels have output.
One channel has no output:
In this diagram, you see that something is wrong with the left channel of the radio.
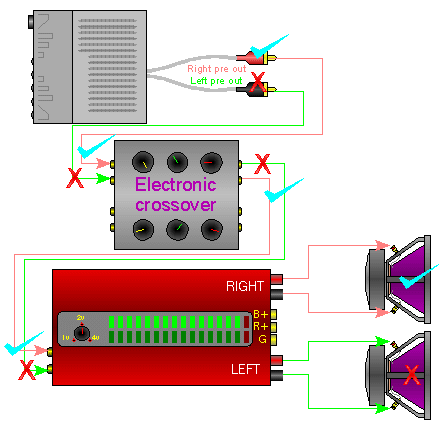
Drag your mouse over the picture below. You'll see how the RCA cables are reversed at the head unit. This means that the right signal line is now connected to the defective channel of the head unit. You can see that the output, at the speakers, has now switched sides. This is because the green signal line is now connected to the good channel of the head unit. Click on the image to optimize its position.
Unknown break in the signal line:
Until now, you were shown where the signal line was broken. In your vehicle, it is unlikely that there will be Xs and checks on all of the signal lines. To prevent damage to your amplifiers and/or speakers, I strongly recommend turning the amplifier off before plugging or unplugging the RCAs. Failure to do so may let the smoke out of your amplifier rendering it useless.
Method #1:
If you have a double female RCA coupler (barrel connector), this is one of the simplest ways of troubleshooting an audio problem.
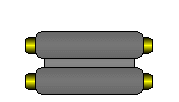
If one audio channel is not working properly and you suspect that that the problem may be in you crossover or any other audio component, you can simply insert the barrel connector in place of the suspect piece of audio equipment. If the formerly dead channel now plays, you know that the bypassed piece of equipment was the problem. Since the crossover has outputs going to multiple amplifiers, you will have to plug each amplifier into the barrel connector individually.
Method #2:
If you believe that the RCA cable running from the head unit to the rear of the vehicle is defective, you can get a long patch cable and run it outside of the vehicle. This will allow you to quickly determine whether the cable is bad without having to route it under the carpet. I know that running it outside of the vehicle might be obvious to some people but I thought I'd mention it anyway.
Method #3:
In this diagram, you can see that one channel is out. The problem could be caused by any one of the components (head unit, RCA cables, crossover, amplifier, speaker wires or speakers). If you hold the cursor over one of the links (at the left of the diagram), the image will change from the diagram with the original problem to a diagram showing how the symptoms change (or don't change) depending on the action taken in the new diagram. When you move the cursor off of the link, the image goes back to the original image so you can see how each step (or action) affects the original problem. You may have to hold the mouse cursor over each 'step' for a few seconds until the new image loads completely.
Checking RCA cables:
When there is a question of whether a piece of electronic equipment or a set of RCA cables is bad, you should do the following. Unplug BOTH of the connectors on BOTH ends of the cable. It is now completely disconnected from everything. Take ONE side of the jacks (left OR right) and use it to do this test. We will start with the right side of the RCA cable. Plug the right side of the cable into the right side of both pieces of equipment (the crossover and the amp in this situation). If the right side of the amplifier starts to play, then you know the right side of the RCA cable is good. Move the cable around a little on both ends to make sure that the cable is not intermittently defective. If the sound doesn't cut out, we will assume that the right side of the cable is indeed OK. If the sound cuts out or does not come through, try using the other channel of the RCA cables. Now move the RCA cable connector from the right channel of the amplifier to the left channel of the amplifier. If the left channel of the amplifier now plays, you know that both channels of the amplifier are OK. Now move the RCA cable connector from the right channel of the crossover to the left channel of the crossover. If the audio plays through again, we know that both channels of the amplifier and both channels of the crossover are OK. If the audio does not play through, the left channel of the crossover or something in the left channel's signal line before the crossover is defective. Now repeat the process with the left side of the RCA cable. If the left channel of the cable is bad, it will not pass all of the tests as it did with the right side. Of course you could also check the RCA cable with an ohm meter if you have one available.
Meter readings:
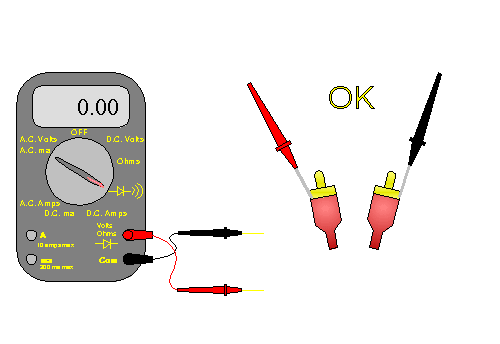
The demo below shows how the meter will read with the leads shorted (touching) or open (not touching).
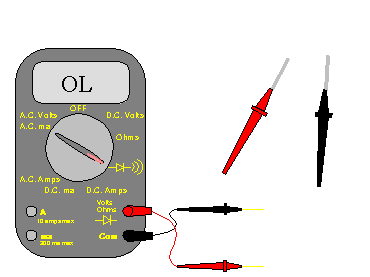
Drag your mouse over the diagram below. If the shield connection of the cable is good, the meter will read the same as if the meter leads were held together. If the shield connection is defective, the meter will read the same as when the leads are open (not touching to anything). Do the same thing for the center conductor. You will also have to check the other channel of the RCA cable. If you check from the shield to the center conductor, the meter should show open.
Engine Noise
(alternator whine)
These are general rules or tips which will prevent or reduce the problems with engine noise.
-
Run the patch cords on the opposite side of the vehicle from the main power and remote output wires.
-
Make sure that all of the audio components are well grounded to an area that has has been cleared of all paint, primer and other protective coatings.
-
Don't use the factory wiring for the head unit's (head unit) ground connection. Ground the head unit to the chassis (body) of the vehicle. If the head unit isn't mounted directly to a solid, GROUNDED metal structure, ground the case of the head unit to the same point that the head unit's ground wire is connected.
-
Do not extend the ground wires of any component unless it's absolutely necessary. If the device's manufacturer designed a high quality input circuit, extending the ground wire will only cause more problems. If all else fails, and you have one audio component which is allowing noise to enter the system, you can then try different grounding points to see if they make a difference.
-
If the insulation on the patch cord is damaged and is allowed to touch to ground, it will likely allow noise to enter the audio signal path. If the patch cord is pinched under the back seat or where it crosses over any sharp metal (where it enters the trunk) it will cause noise problems.
-
As you already know, an amplifier's speaker output generally has one speaker wire with the audio signal and another (the reference) which is connected to the audio ground inside of the amplifier. If the reference is allowed to come in contact with ground (in the door or back deck of the vehicle), a ground loop may be created allowing noise to enter the system. This is not very common but it has happened.
-
Set the amplifier's gain controls properly. Setting the gains too high will only make a problem with noise worse.
NOTE:
DO NOT make any connection (RCA or otherwise) with the system switched on. Doing so may cause damage to speakers or amplifiers.
The image below is a normal system with a head unit, equalizer, crossover and 2 amplifers.
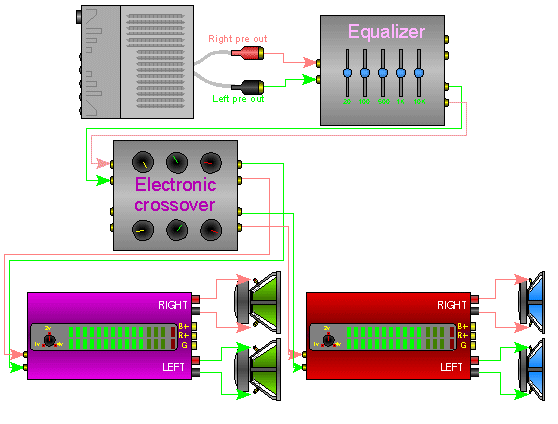
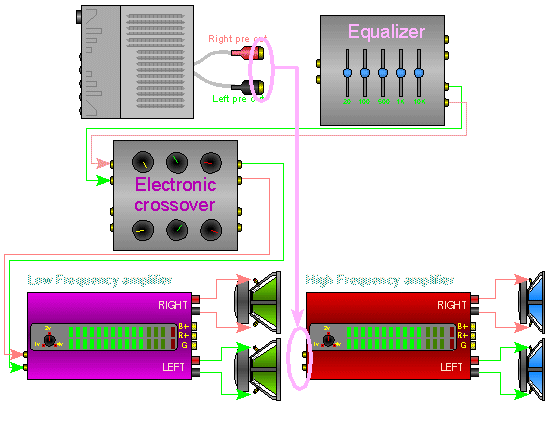
The first step is to bypass all components and connect the head unit directly to the high frequency amplifier. The high frequency amplifier should be used because the tweeters connected to the amplifier will best reproduce the frequencies that are associated with alternator whine. If the noise goes away with only the head unit and high frequency amplifier connected, it is a fairly safe assumption that these two components are OK. You can also connect the head unit directly to the low frequency amplifier to see if the noise returns (although the noise may be hard to hear since woofers don't reproduce the higher frequencies very well). If there is noise with only one of the amplifiers, the problem probably lies within the noisy amplifier. If the noise is present with both amplifiers, there may be something wrong with the head unit.
Testing the head unit's shield ground connection:
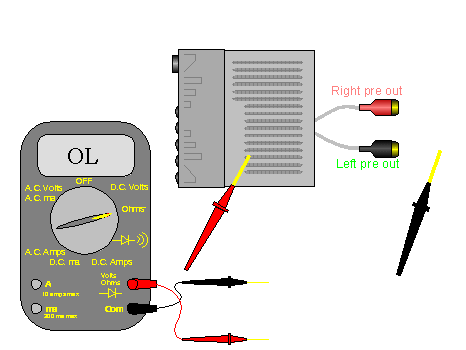
If you want to check the shield ground, use an ohm meter and make sure that there is continuity between the case of the head unit and the RCA shield. Make sure that the RCA cables are disconnected from the RCA jacks on the head unit. There should be less than 1 ohm between the RCA output shields (the shiny outside part of the connector) and the case of the head unit. If the resistance is more than a few ohms, you may want to have a QUALIFIED technician check it out. This is only for a head unit with UNbalanced preamp outputs. If you find that the shield connection is defective, it was likely damaged when a 12 volt power source was allowed to come in contact with the shield at some point in the system.
The next step is to start inserting the rest of the audio components (one at a time). If you insert a component, and the noise returns, bypass it again to make sure that the system is again noise free. If you have more components that you have not yet inserted , insert them one at a time so that there is no more than one component inbetween the head unit and the amplifier. If one component allows noise to enter the system whenever it is in the signal path, have it tested by a qualified technician.
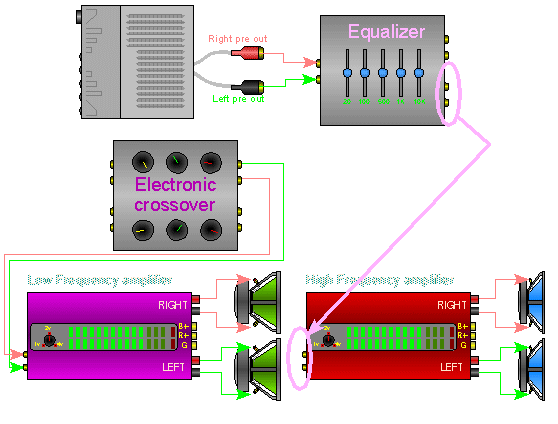
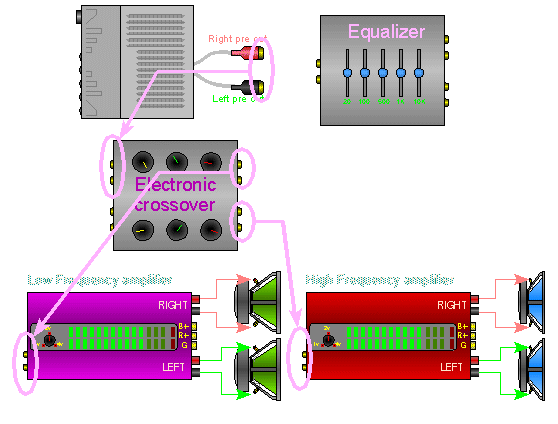
After checking all of the components (individually), try reconnecting the head unit to the crossover but leave all other processors out of the line. Connect the crossover to the amplifiers. If there is no noise when the high frequency amplifier (alone) is connected to the crossover but the noise returns when both amplifiers are connected to the crossover, one of the amplifiers may not have enough electrical isolation from the chassis ground. The isolation from chassis ground is determined by the design of the amplifier's input circuit. If one amplifier is causing a problem, you may need to use a ground loop isolator to break the DC ground connection. Inserting the isolator between the output of the crossover and one of the amplifiers should significantly reduce or eliminate the noise.
|


