(this ain't gonna be as easy as you might think)
General Signal Information:
You should know a few very basic things about digital recordings and the way music is recorded onto disc. There is a precise limit to the signal level. The absolute maximum level is 0dBfs (zero dB full scale). This makes it much easier to set the gains than it would be with analog tape (cassettes tape).
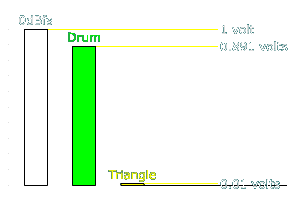
If a CD player produces 1 volt with a 0dBfs signal, the output will never be more than 1 volt (disregarding tone controls/equalization which will be covered later). Many CDs (especially rap) will be recorded with significant portions at 0dBfs. This will look like clipping if the waveform is viewed with a 'scope (or in a program like 'Cool Edit') because there will be 2 or more consecutive points of sampled data at its maximum positive or negative level/value. Most pop music is not recorded with clipping (never 2 or more consecutive points of sampled data at its maximum positive or negative output value) and will generally have at least 1dB of headroom when encoded. Pop music will generally have only about 15dB of dynamic range in the middle of a song (lead in/out excluded). This means that the signal level will be between 0dBfs and -15dBfs for most of the song. If you listen to high quality recordings like those from Sheffield Labs (or other audiophile labels), the dynamic range will be much greater. This is because, many times, they don't use any processors like compressors (a compressor is essentially an automatic volume control that can reduce the dynamic range of a signal or can keep the signal from going above a given level)‡. This means that some of the softer sounds are just that... soft and the loud sounds are... loud. This means that the triangle may produce an output level of maybe -40dBfs and the drums -1dBfs. If the deck produces 1 volt with a 0dBfs track at full volume, the drum will produce a 0.891 volt signal and the triangle will produce a 0.01 volt signal. The image below shows the relative signal levels.
You've probably noticed that TV commercials seem to be much louder than normal programming. It's not that the maximum level of the commercial is any louder. It's that the commercial is recorded with very little dynamic range. Almost all of the recorded audio will be within a few dBs of the maximum level. The signal is compressed to have a very small dynamic range.
General CD Player Information:
Many CD players will be able to produce a 0dBfs signal with no clipping at full volume (or one step down from full volume) with their tone controls set to their 'flat' position (in the middle of their range - no boost or cut). Most of those players will produce a clipped output (when set at or very near maximum volume) if a 0dBfs track is played in a band of frequencies that are boosted by the tone controls (i.e. an 80hz 0dBfs track) and the tone controls (the bass control in this instance) are set for even 'minimal' boost (especially 2 volt preamp output models). Some decks will produce a clean signal no matter what the tone settings. Now, this doesn't necessarily make one deck better than another but you need to know how your deck performs. If you have access to an oscilloscope, you can check the output signal at the RCA jacks. Play a 0dBfs test tone between 40 and 100hz with the volume and bass at their maximum settings. Take note of the peak voltage (from the reference to the top of the waveform). You can multiply the peak voltage by 0.707 to get the RMS output voltage. Check to see where it clips (the volume control's position) with the tone controls set flat.
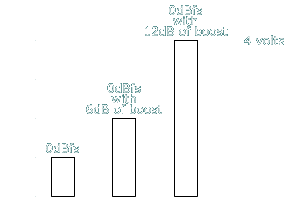
In this diagram, you can see the 1 volt signal produced by the 80hz 0dBfs track. If the bass is boosted 6dB (1/2 on many decks), the output would be 2 volts. If the bass is boosted 12dB (maximum boost on some decks), the output voltage will be 4 volts. If this were a 2 volt deck (that produced 1 volt output with a 0dB track with no boost) it would be clipped for anything above 6dB of boost. A 4 volt out deck could produce the signal without clipping.
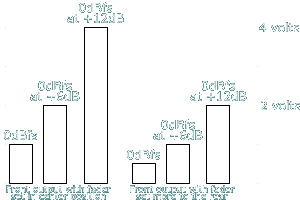
As a side note, if you had a 2 volt (max) deck that produced 1 volt (at full volume) with the 0dBfs track (no boost) and you wanted to be able to use the full range of the bass and treble controls, you could fade away from the RCA output you were using (the front in this case). In other words... If you were using the front RCA outputs and you wanted to prevent them from clipping, you'd fade to the rear. This would reduce the gain of the signal going to the front preamp section of the head unit (internally) and would therefore reduce the overall level of the front outputs. If you faded the front signal level down 50%, you would only get a 0.5 volt out signal with the 0dBfs track (no boost) but the 80hz track could be reproduced at full (12dB) bass boost without clipping the output of the deck. Using the fader is the only way to prevent clipping on some (maybe most) decks while using the tone controls at full boost.
General Processor Information:
Signal processors (equalizers, crossovers...) have a limited output. Some of the less expensive pieces of equipment are simply using a regulated 9 or 10 volt power supply. This limits the theoretical maximum peak output to 5 volts peak†. Since the opamps that they are using are less than 100% efficient (in their ability to reach rail voltage), the max peak output is more likely to be about 3.5-3.8 volts. This equates into an RMS output voltage of about 2.5 volts. If your head unit is only capable of producing 2 volts out and the signal processor is set for 0 gain, a signal processor with this type of power supply is capable of producing a clean output when driven with your head unit's maximum possible output voltage. Other signal processors use switching power supplies (either capacitor or transformer based). The better pieces of equipment have a total rail to rail voltage of ~30 volts (±15 volts). This gives them the ability to produce an output voltage of ~9-10 volts RMS. Signal processors with this type of supply can produce a clean signal with virtually any head unit with virtually any amount of boost from the tone controls (unless the head unit has a switching power supply and/or high voltage balanced output). One exception would be when a deck with high output voltage were driving a relatively high voltage signal into the signal processor and the signal processor was set to have gain in the output signal. The gain could be from the overall output gains being set to more than 0dB or when one or more of the equalizer's sliders set for boost. Click here for more info about processor power supplies.
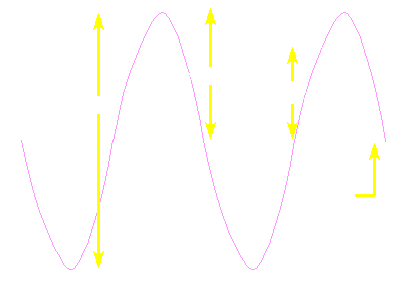
Peak voltage is the voltage from the reference (0 volts) to the top of the waveform (when viewed on an oscilloscope). If you don't fully understand this, go back to the Measuring AC Voltages page of the site. You need to understand this before moving on. This diagram is from that page.
Gains on Crossovers:
Most signal processors have gain controls. Some have input gains but most all have output gain controls. For crossovers, many have a maximum output of zero or 'unity' gain. This means that the maximum output level will be no greater than the input signal. If a crossover has gain (above unity) it will be marked on the controls as positive gain. If the zero (0) point is in the middle of the control's range, the crossover will likely have gain. If zero is at the clockwise-most position, it likely has no gain. Having gain in a crossover isn't necessary for good sound quality. Many times, the added gain will only mean more noise.
In the following demo, you can see that there are 2 sine waves. The one on the left shows the output of the head unit. The one on the right is the output of the signal processor (EQ, Crossover...). You can adjust the volume of the head unit (0%-100%) and the output gain of the processor (click on the slider to lock and unlock it). The signal processor's gain control has a range of ±12dB. The center position is 0dB gain (or no gain and no change in the signal level). Notice how the signal output of the processor changes in relationship to the head unit as you set the output gain. You should also notice how little gain it takes to cause the processor's output to reach the point of clipping for processors without switching power supplies. You can set the head unit's max output voltage by entering it into the text field above the volume control.
An alternative to Ruffle for viewing Flash content is to use an alternative browser like the older, portable version of Chrome (chromium), an older version of Safari for Windows or one of several other browsers. More information on Flash capable browsers can be found HERE. It's not quite as simple as Ruffle but anyone even moderately familiar with the Windows Control Panel and installation of software can use Flash as it was intended.
Gains on Equalizers:
Equalizers may (likely will) have the same gain controls as those found on a crossover but will also have controls for individual frequencies. When using any of the controls in the boost position, the output voltage at that frequency will increase. This means that a 4 volt input signal can be boosted only ~7.5db before the output of the EQ clips (even those with switching power supplies). This means that you want to use the 'boost' as little as possible. It's best to have a speaker system with a flat response so that boosting any one frequency significantly isn't necessary. Having a speaker system that requires a lot of boost at one point will reduce the overall headroom available (to prevent the signal from being clipped at the point of the boost, the overall volume level will have to be kept at a lower point).
Gains on Amplifiers:
Most amplifiers have gain controls. Some are simply marked 'min/max' others give you a voltage. You might think that the amp that gives you a voltage would be easier to set but... it ain't so. The voltage markings could mean the voltage that it takes to reach clipping or they could be the voltage it takes to reach rated power. Since most amplifiers don't clip precisely at rated power (some are under-rated, others are over-rated), the amplifier would have to be tested to determine what the markings on the gain control mean. You should also keep in mind that different ohm loads will cause the amplifier to clip at different levels (this is especially true for amps without highly regulated power supplies). For amplifiers with unregulated (or loosely regulated) power supplies, a 4 ohm load won't drag the rail voltage down as far as a 2 ohm load††. You'd have to test the amp with the ohm load that you'd have in the vehicle to know where it clips. If you're using an oscilloscope to set the gains, markings on the gain controls are completely irrelevant.
††This doesn't mean that one type of power supply regulation is better than another. Highly regulated power supplies, unregulated power supplies and loosely regulated power supplies have their advantages and disadvantages. There's no 'best' when it comes to power supply design.
Example:
100hz 0dBfs track
Head unit capable of producing a 4 volt output
Processor capable of 2.5 volts output
Let's assume that the deck (at full volume) produces a 1 volt signal with the test tone with all of the tone controls set flat. If we boosted the bass by 6dB, the output voltage would be 2 volts. If we boosted the bass by 12dB, the output would be 4 volts. This should still be unclipped for this head unit. If we drove this signal into the cheaper processor (with only a 10 volt regulated supply - and a 2.5 volt maximum output), the output signal from the processor would be clipped (unless it had some sort of 'input' gain control). The head unit would not be able to be used at full volume with this processor. The gains on the amplifier would have to be set to about 2.5 volts or less (assuming that the gain's markings indicated the amount of signal needed to drive the amp to clipping). If the gains were set to anything higher than 2.5 volts, the processor would clip before the amp reached full power (even though the signal from the head unit is still 'clean'). If the bass boost were set back to +6dB, the volume control could be used throughout its range. To use the bass boost at any setting higher than +6dB, you'd need to go to a processor with a switching power supply. It's important to know what your equipment is capable of so that you can know how to set all of the gains.
In the following demo, there's a display similar to what you'd have on a spectrum analyzer. Each LED indicates the relative level of the signal at each individual frequency. When all LEDs are at the same level, all frequencies in the signal will be reproduced at the same output level (assuming that they were recorded at the same level). At points on the display where the LEDs are at a higher or lower level (referenced to the 'flat' part of the spectrum), the signal output level at those frequencies will be higher or lower than they would be if the bass control were bass set to 'flat'. Let's assume that the vertical dimensions of the display correspond to the range of the output of the head unit. If the LEDs go beyond the top of the display, the head unit is clipping (if there's a low frequency signal in the recorded material). As you can see, the output will remain 'clean' at any position on the volume control as long as the bass is set flat (or for negative gain). As the bass is increased, the volume control can't be used at its full max position without driving the output into clipping. The controls work just as they did in the previous demo.
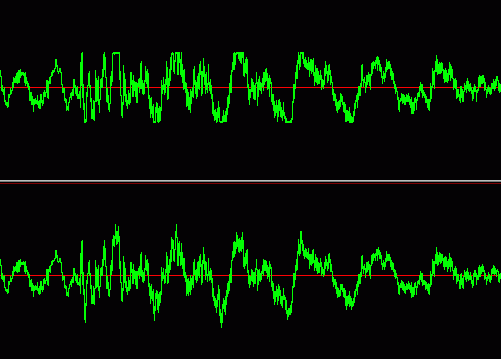
As a refresher... The following image shows what a 'clean' signal looks like and what a 'clipped' signal looks like. The top is clipped (you can see the flattened top and bottom of the wave). The bottom waveform has clean peaks (no clipping). This image is a short segment of a complex audio signal. For most of this discussion, we'll use more simple sine waves.
The volume on the 'head unit' below is set (it can't be changed in this demo) to 57 and the bass to +10dB, you can see that all of the LEDs for the frequencies below 100hz have gone off of the top of the display. If you played a 0dBfs sine sweep signal‡, as long as the swept frequency was below ~100hz, it would be clipped. As the swept frequency went above 100hz, the signal level would be unclipped. In the following demo, move your mouse from left to right under the row of LEDs. You can see how the level of the sine wave changes. This is how the output level would change during the sine sweep. Of course, the width of the sine wave would also change during a real sweep. If you were listening to a well recorded piece of music (with a flat frequency response and the highest peaks at/near 0dBfs) and there was some low bass content, the low bass output from the head unit would be clipped.
‡A sine sweep is a sine wave signal that generally starts at a low frequency and increases in frequency. Some sweeps are from 20hz to 20khz. Others will cover a much smaller part of the audio spectrum. For most sweeps, the signal level is constant throughout the sweep.
As you can see in the following demo, there are 2 sliders. The top is volume for the head unit. The bottom simulates the gain control on signal processors/amplifiers. As you can see, If you clip the signal coming out of the head unit, the output of anything downstream will also be distorted (no matter the gain position).
Gain Setting Overview:
In my opinion (and MANY will disagree), the gains should be set so that the amplifier reaches full power just as the head unit reaches maximum output. This would allow you to use the entire range of the volume control (assuming that the head unit doesn't clip at full volume) and still get full power out of the amplifier. If you're an audiophile who likes listening to a flat response‡‡ AND you have a speaker system that produces a flat response AND are listening to music that's properly recorded AND you've purchased the right amplifier, setting the gains like this will prevent clipping (again, assuming that the head unit doesn't clip at full volume). If you're into quality over quantity, this is (IMO) the best setup.
‡‡A system with a flat response is one that will reproduce every part of the spectrum at precisely the same level as every other part of the audio spectrum. This means that if you have a disc that has every instrument recorded at the perfect level (whatever that may be) it will be reproduced that way when played through your system. This is especially critical when listening to instruments like the piano. If the response isn't flat, some notes will be really loud and others may be barely audible (although the system would have to be pretty bad for the difference in levels to be that significant).
- NOTE:
- If the gains were set as above, there would be a few CDs that would not cause the amplifier to produce full power (because they were recorded at a level that is too low). For some people, not allowing their amplifiers to reach full power is a tragedy that rivals death. For those who buy amplifiers with enough power to cleanly reproduce the desired SPL, this isn't a problem. Unfortunately, MOST people don't buy amplifiers that can produce the desired SPL without driving them into clipping.
- The best situation would be a head unit that would never clip regardless of volume or tone settings and more amplifier power than you'd ever need. Then we'd just play a 100hz 0dBfs track with the volume and bass at maximum and set the gains on the amplifier to just below the point where the amp starts clipping.
Spectrum Analyzer:
To properly set the gains, you'll need a spectrum analyzer. It will help you to assure that your system will have a flat response (or at the very least a smooth response).
System #1:
For a system with a single amplifier, we can use a pink noise test disc and a spectrum analyzer to set the system for a flat response (assuming you have an equalizer and a spectrum analyzer). Now you need to listen to some of your favorite music and set the bass and treble as you want them (you generally use the EQ to correct problems in the frequency response of the system and the bass & treble controls to correct for poorly recorded music). Try to find a setting that will work with most of the music you listen to. If the pink noise track is recorded as high as possible (some points at 0dBfs), you can use it to make the final gain adjustment. Turn the gains down to their minimum setting. Turn the CD player up until the deck just starts to clip (while the scope is connected to the RCA outputs of the deck - you'll need a y-cable to make the connection) and back it down one or 2 steps. Now go to your amplifier and (while looking at the amplifier's output with the 'scope), turn the gains up just until the amp starts to clip. You may have to watch it for a few seconds or more to determine the best setting. If the pink noise is recorded at something less than the maximum possible (no points at or near 0dBfs), you'll need a disc with a sine signal at the point where you have the most boost (on the EQ or tone controls). Then you would play that tone and adjust the gains on the amp so that it doesn't clip at full volume.
Note on the Spectrum Analyzer:
If the spectrum analyzer doesn't have an 'average' function, you'll have to sort of average the levels in your mind. The LEDs are not going to remain perfectly still with pink noise. This means that you'll have to watch for columns on the display that are consistently high or low and adjust the equalizer to keep that band generally in line with the other bands. For most testing, you can use an analyzer setting that gives you a 3dB/step display.
As a side note, having a 2 channel scope (most have at least 2 channels), you can have one channel of the scope on the RCA signal and the other on the speaker output. The ground for the scope should probably be connected to the chassis of the vehicle. Don't connect the scope probe's grounds to anything. The display on the scope might be a little noisy but you'll still be able to see the clipping. If you were to connect the ground for one scope probe to the RCA shield ground and the other scope probe ground to a speaker signal wire (like the right negative on many amplifiers), you'd probably damage the head unit's shield ground (and possibly the amplifier). Also... The voltage settings for each of the oscilloscope's channels will have to be different to be able to get good enough resolution to clearly see the clipping.
System #2:
Let's say we have a system with 2 amplifiers, a crossover and an equalizer (and, of course, a head unit). Let's say that the EQ and the crossover both have switching power supplies (so we don't have to worry so much about clipping in the processors). Set the gain controls on the crossover to 0dB (no gain).
Since the highs amp will be covering most of the audio spectrum, we'll use it as the reference. Turn bass amplifier off. You can remove the remote wire from the amplifier's remote terminal. Be sure to insulate the wire so that it doesn't ground out and damage the head unit. Removing the RCAs will also do the trick. Set the volume of the highs to play at a low to moderate level and use the equalizer and a pink noise track to get a flat response on the spectrum analyzer. Only concern yourself with the frequencies above the crossover point (commonly that's about 100hz). The head unit's tone controls should be set to flat and loudness contour should be switched off.
Now, using the scope (connected to the RCA outputs) and the pink noise disc, let's set the head unit so that it is just at the point of clipping. Leave the bass and treble flat. Make a note of the volume setting and turn the volume down. Reconnect your highs amp and connect the scope to the speaker output of your highs amp. Turn the head unit back on and the volume to the maximum where it was not clipping. Play the pink noise and increase the gain on the highs amp just to the point where the amp starts to clip. Since pink noise is somewhat tough on tweeters, you may not want to take any more time than necessary.
Remove the RCAs from your highs amp (don't touch the gains). Set the bass on the head unit to about -1/2 of its range (-5 for a control that will go ±10). Adjust the low frequency amp to have a flat response (just as you did for the highs amp - using pink noise and the spectrum analyzer). This may be difficult to do because of a lack of adjustability on the EQ and the transfer function of the vehicle.
Turn the volume down and reconnect the highs amp. Turn the gain all of the way down on the amp. Using the spectrum analyzer and pink noise, set the gain on the low frequency amp so that the level above and below the crossover point (~100hz) are about the same. The following demo shows how the volume, bass gain and highs gain will affect the level on the spectrum analyzer. Of course, the display won't have a separate set of LEDs for each amp. I made them overlap so that you could see the curves and where they'd intersect.
- Remember that I told you to turn the bass down on the head unit before setting the gain on the lows amp. This was so that you could get more bass (over a flat response) without causing the head unit to clip. If you think you'll need even more bass or if you like a bass heavy system, turn the bass all the way down on the head unit before setting the gains on the amp. This will allow you to get, in effect, ~10-12dB of bass boost with the bass on the head unit set to flat.
NOTE:
Loudness Contour:
Many people don't like having to use their volume controls beyond ~50% of it's range. Many times, it's because they need the low frequency (and sometimes high frequency) boost provided by the loudness contour. Beyond ~60% of the volume control's range, the low boost tapers off to nothing.
Analyzer Mic Location:
If you're setting your system up for listening (instead of competing), you'll place the microphone as near as possible to where your head will be. Placing the microphone in any other location will not provide a flat response in your listening position.
If You Disagree:
I know that many will disagree with this method of setting the gains. That's fine. If nothing else, it should make people think about a few things.
- Most newbies don't realize that having to boost a given part of the audio spectrum (due to inefficiencies in their speaker systems) reduces the available headroom (before clipping occurs).
- They also don't realize that every signal processor can't pass the same amount of signal without clipping.
- Aaaannd... they don't realize just how quickly 10 or 12 dB of boost can force those processors into clipping (no matter the quality or design).
Don't Forget the Fader:
If you don't want to set your gains so that you'll never drive your amplifiers into clipping, you can use the fader to reduce the output level of the RCA outputs. If you're using a single pair of RCA outputs to drive your system (we'll assume the rear outputs), you can fade, let's say, 50% to the front and set everything as described above. Then, if you want to be able to drive your system into clipping just fade back to center. When the fader is set to 50% forward, your system stay 'clean' at full volume.


