|
High Pressure Laminate
High pressure laminate is a cover material that's very durable and produces a relatively good finish. It comes in many styles (solid clors, woodgrain patterns, glossy smooth, textured...). Although it's mainly used for countertops, it also has other uses. I used it when I was building home speakers and have used in on various amp racks.
There are several manufacturers of high pressure laminate. Wilsonart and Formica are two of the most commonly available brands. Most people incorrectly refer to all high pressure laminate as Formica but Formica is a trade name.
Be Careful When Purchasing Laminate:
Many times, when you select a particular style/pattern of laminate, it will have to be ordered. When shipped, it's often rolled up (pattern side inside) for protection and to make it more manageable (some sheets are 5' x 12'). When it arrives at the distributor, unroll it and very carefully inspect it. Many times it will be damaged. If it's simply a cracked corner, that's not significant. Sometimes it will have deep gouges or large scratches that make it unusable. If you don't examine it before you buy it, you may be left with a sheet that's largely useless. If you don't find the damage before you leave with it, there's very little chance of getting a replacement or refund. This could be a very costly mistake.
Cutting the High Pressure Laminate to Size:
If you know the precise measurements of your speaker box, you may be able to get your high pressure laminate dealer to cut the pieces to size. Make sure to add approximately 1/2 inch to the required measurements when you get it cut. If you want to cut it yourself, there are several ways to do it. If you only need to cut a few pieces, you can simply use the same methods used to cut thin acrylic (score and break, jig saw - visit the Working With Acrylic page if you have not read it yet). If you have to cut a lot of pieces, you may want to build a jig like the one below. After it's built, you can accurately cut a lot of pieces very quickly.
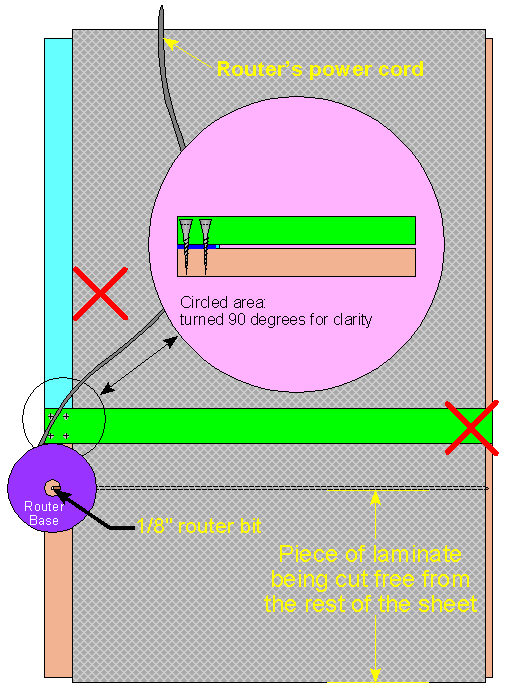
The following diagram shows a jig which will help you to cut high pressure laminate relatively easily and very quickly.
-
Legend:
-
The gray hatched area is the high pressure laminate.
-
The light brown area is the base piece of MDF (or other material).
-
The fence (green board) is a piece of plywood or other REALLY stiff piece of wood (no pun intended :). Don't try to use MDF for the fence (unless you use a really wide piece) because it will flex too easily when the router is pushed against it. You can see that it is screwed down to the base. It must be securely fastened (glued AND screwed) so that it stays square with the base board.
-
The cyan piece of wood gives you a reference to help you keep the high pressure laminate square in the jig.
-
In the exploded view section (in the violet colored circle), you'll see a dark blue piece of material. This piece needs to be as thick as the high pressure laminate or very slightly thicker. It is there to allow clearance for the high pressure laminate.
-
The dark blue circle (router base) shows the router's position with reference to the fence. The tiny white dot in the middle of the base is the router bit. The router's other pieces parts have been omitted for clarity.
-
The dashed line across the high pressure laminate shows where the router's bit will pass.
Getting started:
To cut the high pressure laminate, I use a 1/8" carbide bit set to cut just slightly deeper than the thickness of the high pressure laminate. After clamping the free end of the fence down, make a cut without the high pressure laminate in place. This will allow the router to more quickly cut the high pressure laminate and will also allow you to easily see where the router will cut the high pressure laminate. With long cuts, you will see that the cord may get caught on the edge of the jig as you make the cut. To prevent this problem, drape the power cord over the long end of the jig (away from the fence).
Making the Cut:
If you already made the first cut in the base of the jig, you know exactly where the router will cut. Slide the MDF under the fence until it is in the proper position to cut the high pressure laminate to size. When it's in place, clamp it down in the places marked by the red X's. This will prevent the fence AND the high pressure laminate from moving during the cut. Then... Make the cut.
Note:
If you're router's base isn't perfectly round, take note of how it rides against the fence during the primary cut into the base board. Make sure that you make your cuts in precisely the same way.
Bonding the High Pressure Laminate to the Wood:
Contact cement is the most common way to bond the high pressure laminate to the substrate (wood enclosure). I strongly recommend using a contact cement specifically designed for high pressure laminate. If you've never used contact cement, you should know that it's applied to BOTH pieces which are to be bonded together. After applying it to the components, you must wait until the contact cement is dry to the touch (10 to 15 minutes depending on temperature and humidity). After the contact cement is dry to the touch... when the two pieces (wood and high pressure laminate) touch, they are instantly bonded and it is very difficult to reposition the pieces. It's like letting the adhesive side of two pieces of adhesive tape touch together. When you set the high pressure laminate down, make sure that it is in the proper position.
Applying the Contact Cement:
There are a lot of good ways to apply contact cement. My favorite method is to use a wide paint scraper/putty knife with notches ground into its cutting edge. This allows a precise amount of contact cement to be applied to the surfaces. A trowel would also work for very large surfaces but for small enclosures, I'd strongly recommend a modified paint scraper. The image below shows you what the modded scraper looks like. When you're spreading the contact cement towards the edge, you can let the scraper quickly slide straight off of the edge of the box and very little or no contact cement will come off of the scraper nor will it drip down the edge of the box (unless you have WAY too much contact cement on the workpiece). It probably works best if you wait until almost all of the contact cement has been spread on the center of the workpiece and just a little contact cement is left to be spread.

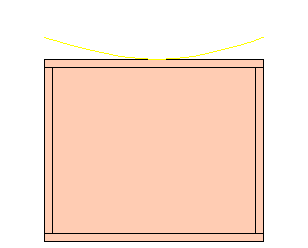
As was stated before, the laminate will instantly bond when it touches the other glued surface. To help you get it laid down properly, you can flex the high pressure laminate slightly to allow a small amount of the high pressure laminate to touch the wood while you make sure that the two pieces are properly aligned. Then you can slowly lay the rest of the high pressure laminate down (from the center outward to the edges). The drawing below may help you understand what the heck I'm talking about.
Note:
For very large pieces, you can use dowel rods or pieces of small nylon rope to keep the pieces apart until they're properly aligned. You lay several dowel rods on the speaker enclosure (or whatever you're covering) and then lay the high pressure laminate on top of the dowel rods. After carefully checking the alignment, you pull the dowels out one at a time as you push the two pieces together. Again, this should probably be done from the center out to make sure that the high pressure laminate lays down properly.
100% Bonding:
OK, since the high pressure laminate isn't infinitely flexible, there's almost no way to get 100% contact between the wood and the high pressure laminate but to make the best contact possible, use a rubber mallet to pound the high pressure laminate down to the wood. Pay particular attention to the edges but, since you need to do this before you trim the high pressure laminate flush with the box, you must be careful that you don't hit the laminate past the edges of the enclosure because it will break the high pressure laminate. If you don't have a rubber mallet, you can wrap a scrap piece of MDF in a cloth rag and hit it with whatever hammer that you have in your shop.
Right angle Laminate Trimmers:
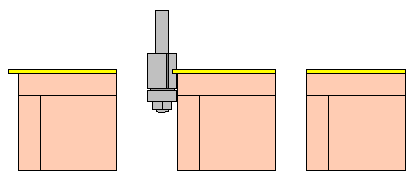
There are two different bits that are commonly available to make square, flush cuts. These leave the edge of the laminate perfectly flush with the guide surface. The bit on the left uses a ball bearing as a guide. When the bearing is spinning freely, it rolls along the guide surface at the rate determined by the forward travel speed of the router. This prevents the guide from marring the guide surface. This is very important if the guide surface is a finished surface or another piece of laminate. The bit on the right is a solid carbide bit. This one uses only a smooth part of the shaft as a guide. Since the guiding part of the bit is spinning at 20,000+ RPMs (unlike the roller bearing), these will often marr the guide surface so it's important that you don't use it against a finished surface unless you know that the surface is durable enough to prevent marring. These are generally used for rough cuts (where the edge being cut won't be visible in the finished product. These require less maintenance than the bits with the bearing so they're often a good choice.

Trimming the Edge Square:
The first cut after the laminate is bonded to the wood is a straight, 90 degree square cut. Either of the previously shown bits will do the job. The diagram below shows approximately what the laminate will look like before and after the cut.
22 Degree Angle Laminate Trimmer:
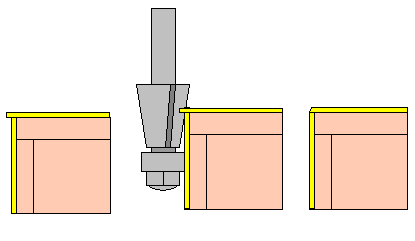
This bit is used to make the final cuts on the edge of the high pressure laminate. You must use an angled bit so that the cutter does not damage the face of the laminate and to prevent having sharp square edges. The diagram below shows how the 22 degree bit cuts the edge of the laminate. I generally set the bit to cut all of the way through the top layer of laminate and VERY slightly into the next piece of laminate. This will leave a nice clean edge with very little cleanup.
-
Notes:
-
Using tape such as clear packaging tape is very useful for preventing the bearings from coming into direct contact with the face of the laminate. It will also keep contact cement from dripping onto the edge of the laminate when applying contact cement to adjacent edges.
-
Excess contact cement can be removed with mineral spirits or acetone but acetone generally evaporates too quickly to efficiently remove contact cement.
-
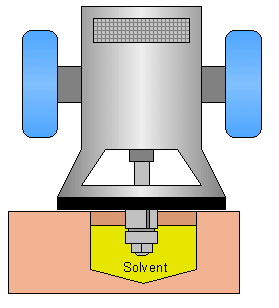
If contact cement gets into the roller bearing (and it will), it can be removed with with mineral spirits. If the bearing repeatedly gets bound up with contact cement, you are probably using too much contact cement. If you have trouble getting the bearing to spin freely (and it must spin VERY freely) because the contact cement is too deeply embedded in the bearing, you can counter bore a piece of wood with to a depth of about 3/4" and fill the counter bore with mineral spirits then you set the router on the piece of wood (where the bit drops down into the hole and soaks in the mineral spirits). After soaking for a few minutes, the glue can be easily removed (AFTER YOU'VE UNPLUGGED THE ROUTER). If you use anything other than mineral spirits for a solvent (like acetone) test the plastic parts of the router for compatibility. Acetone will melt the plastic base of some routers. I've never had that problem with mineral spirits.
Like this:
-
When using a router bit with a roller bearing, you should start the cut on a corner. When the router bit is spinning at 20,000+ RPMs, the bearing is also spinning at that speed. If you start the cut anywhere other than the corner, the face of the high pressure laminate will be scarred because the bearing cannot instantly stop spinning when it touches the high pressure laminate. If the corners are getting scuffed, you can apply some tape (masking, packing) where the bearing touches. If the tape is too thick, it will affect the cut and may require that you readjust the router. Don't allow the tape to overlap. When you go off of the end of the tape, over a wrinkle in the tape or onto a double layer of tape, the cutting depth will change and that will be VERY visible in the cut edge.
-
Plunge routers are OK for making the 90 degree cuts but may not work well for the 22 degree cut because the base of the router will flex slightly. This is because the height adjustment is determined by a clamp on only one of the support/guide rods. When pressure is put on the router, its height/cutting depth will change slightly making the cut crooked. If the router has stop-posts on the side opposite the lever-latch, you can probably use those to make the base stable.
When doing trim work, you don't need a large router (like those shown on the Basic Enclosure Calculations page). Routers like the one below are small, lightweight and easier to handle than the larger routers that you'd use cutting 3/4" MDF or similar material. Smaller routers often have more precise adjustments and remain precisely as you set them (larger routers may not be as rigid).

|


